Tuesday, December 13, 2011

You've Got Mail!


These mini mailboxes from Target are so cute!!  I bought these last year from their dollar spot and never did anything with them.  Well, I came across them in my flurry of crafting and decided to do something with them this Christmas.  I am going to fill these with Hershey Kisses and a special gift for a few of my friends and family.
I cut the Christmas paper just short of 4 inches and it fit perfect.  The reindeer (isn't he so cute!!) is from Doodlecharms.  I tend to forget about that cartridge when I am crafting.  I will have to move it to my favorites drawer so I am reminded to use it more often.
I also like these because I was able to use some of the busier Christmas paper I have without it being overwhelming.  Great way to use that paper you just don't know what to do with.
I like that this can be a cute Christmas decoration after the gift is opened.
Parts and Pieces:
DCWV Christmas Stack
Mailbox from Target
3/4- inch circle punch
Stampin' Up! Card stock - Close to Cocoa, Creamy Caramel
Doodlecharms Cricut cartridge
Stickles - Christmas Red
Stampin' Up! Ink pad - Real Red
 Stampin' Up! Stamp-n-Write marker - Handsome Hunter
My Pink Stamper stamp - Christmas Wishes
Google eyes
Stampin Up! scallop circle punch

Sunday, December 11, 2011

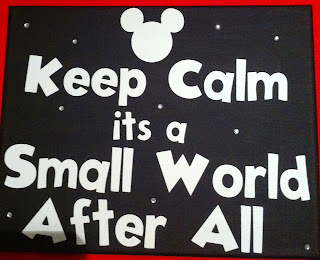
Keep Calm...


This is yet another idea from Pinterest (I really, really love that site!).  I could not wait to make it for my kitchen.  I really should have been working on Christmas presents, gift wrapping, and cookie baking but I couldn't get this one out of my mind.  I am a huge Disney fan and this was so perfect for me.  I wanted to make this on canvas and needed to use my Cricut Gypsy to design and cut this one.  Mickey Font was perfect for the sign and I was so happy I had white vinyl on hand.  I also used my iRock tool to add the sparkles. 
I need to design and make some for my kids as well.  When I showed the girls this one, they all wanted it for their rooms.

Parts and Pieces:
8x10 Canvas from Michaels
Black Acrylic paint - Plaid
White Vinyl - Cricut (Provocraft)
iRock tool and gems

Monday, December 5, 2011

A Pretty Lamp to Light the Way


Another idea I saw on Pintrest (I just LOVE that site!!).  My oldest daughter has decided to redo her room.  I really did not want to have to buy new bedding and change everything that was blue so I was thrilled when she agreed to just add some new colors.  I saw a redone lampshade like this one on Pintrest and thought it would be perfect for her room.  It would add a girly flair and make use of a lamp we already had.  We plan to paint the base once I get out and get the paint.
I got the ruffle trim from JoAnn's and already had the jeweled brads and Prima Flowers.  I needed 6 yards of the trim to cover this lampshade.  I used my trusty hot glue gun to adhere the trim to the shade.  The lamp uses a low wattage bulb so I am not too worried about the heat.  In spite of the many times I burned my fingers with the hot glue (I really need to pay more attention to what I am doing and less on the Harry Potter movie playing in the background) I had a lot of fun making this.  Of course, there was the added bonus of a happy teenager when she saw her new lamp.  I think I got some good mom points for this one.  :)

Happy Scrapping and Crafting!

Wednesday, November 23, 2011

Pintrest!!!!


So I have spent the last week completely obsessed with Pintrest.  This online pinboard has given new life to my creative side.  I was feeling very blah and non-creative over the past few weeks and this site has made me happy and crafty again.  LOL 
One idea I saw was using decals to decorate a Kitchen-aid stand mixer.  Well, I have a Cricut and I have vinyl so I can do this!!  The hardest part was deciding what to put on there.  My kitchen is Disney so I considered putting Mickey heads from Mickey and Friends but I wasn't crazy about the space it would take on the mixer.  I really like my red mixer and didn't want to cover it too much.  I also wanted something more swirly.  Then I thumbed through the Disney Princess cartridge books and found this leaf swirl icon in Happily Ever After.  I used my Gypsy to get the sizing right and to flip a few of the swirls.  I cut a few at 3-inches and a few at 2 1/2 -inches.  I also used the transfer tape to help make adhering the vinyl to the mixer an easier process. 
I am very excited about my pretty new mixer and can't wait for everyone to see it on Thanksgiving.
Happy Scrapping!

Parts and Pieces:
Cricut Expression
Cricut Gypsy
White glossy vinyl
Happily Ever After Cricut Cartridge

Friday, November 18, 2011

Thanksgiving Canvas


This project was truly a labor of love.  I loved the look of it and I really wanted to make it but I took many, many wrong steps.  I saw this one on Facebook, Old Cricut Community page, and fell in love with the look.  I proceeded to go out and buy the materials and attempt to crate this beautiful project.  That should teach me to try out new techniques before working on the actual project.
The first type of crackle medium I bought was just not a good one.  I was determined though and went back to Michael's for a different type.  This one was much better!
Then I learned that for bigger cracks, make the topcoat nice and thick, do not skim on the paint.  As luck would have it, I liked the streaks from where the paint had thinned out so it wasn't a total disaster.  When working with crackle medium, you can't go over it again, you will lose the crackle effect.  Once it starts to dry, that is it, you are done. 
Then the biggest lesson of all: practice with vinyl and transfer tape before attempting to work with it on the main project.  It will save you many headaches later.  I ruined two 12x12 sheets of vinyl and one 12x12 sheet of transfer tape learning that lesson. 
I think the only part I did right was sizing the image.  I used my Gypsy to size it to 11x11.  I wanted to have some space at the sides and this way I knew the sizing would look good.
Once I got everything figured out and all lessons learned everything went much smoother.  I am making several of these as gifts and I plan on making some with the Christmas art for gifts as well.
Happy Scrapping!

Parts and Pieces:
12x12 Canvas - from Michael's
Cricut Vinyl - Brown
Cricut Transfer Tape
Word Collage Cricut Cartridge
Crackle Medium - Plaid Folk Art brand worked best for me
Acrylic paint - Mink Tan (Americana brand), Wicker White (Plaid Folk Art brand)

Monday, November 14, 2011

Owl Card


Let the mass production for Christmas gifts begin!!

I truly love my Cricut Imagine.  It has made my gift production so much faster and easier this year.  I can choose an image from a cartridge and have it printed and cut and the entire card finished in a matter of minutes. 

Parts and Pieces:
Cricut Imagine
Imagine More Cards Cricut Imagine cartridge
Stampin' Up! Card stock - Chocolate Chip, Whisper White, Pretty in Pink
Stampin' Up! Whisper White Craft Ink
My Pink Stamper stamp - from the Punnylicious set
Pinking Hearts Corner punch - Stampin' Up!
Grosgrain ribbon from Walmart

Tuesday, November 8, 2011

Halloween Word Art


Sorry for the quality of these pictures.  I took them in a hurry with my iPhone.  Most of my blog pictures are taken with my iPhone. It is always handy and easier to upload than with my big camera that has a lot of pictures on the memory card.  I have found that my computer tends to download duplicates of a lot of pictures and I have to spend a lot of time deleting all the extras.  I do not need six copies of the same picture stored on my computer.

OK, enough techno babble.

I know Halloween is over but I have been wanting to make this one for a while.  It was so super easy and inexpensive to create.  My favorite type of projects.  :)

I did this one with the Cricut markers.  I don't use them very often but someone from the Old Cricut Community Facebook Page suggested it and I thought it was a great idea for a simple project like this one.  The cartridge works best with vinyl but that gets expensive sometimes.  I used the Fit to page feature on my Cricut Expression for this and it fit very well.  I did cut the card stock down first so it would fit in the 8x10 frame.  I think if I were to make more of these I would cut the card stock smaller so I could create a mat for the art.  Just to add another color/dimension to the project.

Parts and Pieces:
Word Collage Art Cricut Cartridge
Stampin' Up! Card stock - Pumpkin Pie
Cricut Markers
Orange Peel Stickles
Frame from Target

Monday, November 7, 2011

Making time to craft

These last few weeks have left me with little time to craft, let alone blog.  I have a list of projects a mile long so I am hoping to be able to make time to sit at my craft table and actually get some work done. 

Happy Scrapping everyone!

Wednesday, October 26, 2011

A Day at the Museum


I had to do a four page spread for these pictures because there are so many good shots of the kids and my wonderful hubby I couldn't narrow it down further.  I do take a lot of pictures of my family and I scrap most of them.  Each shot of the camera is a memory and I want to include them in the story of our lives.

We spent the day at the Museum of Natural History in New York City and loved seeing all of the things that had been featured in the Night At The Museum movies.  The real Museum of Natural History is nothing like the one in the movie but some of the exhibits are adapted for the movie.  My girls got a kick out of seeing "Rexy" and the Easter Island head "Dum-Dum" as well as all of the "stuffed animals". 

Parts and Pieces:
Bazzill Basics card stock - Sprout
DCWV - At Home Stack
Stampin' Up! - Old Olive
Plantin Schoolbook Cricut cartridge

Friday, October 21, 2011

Baby Birds


I always knew the 3 Birds on Parade Cricut cartridge was cute but until I actually used it, I had no idea it was absolutely ADORABLE!  I had a lot of fun with this layout and this cartridge.  Not only are the images fantastically cute, there is a font that is super cute too.  I look forward to using this cartridge a lot more.  I can see it easily joining Create a Critter as one of my favorites.

Parts and Pieces:
3 Birds on Parade Cricut Cartridge
DCWV Neutrals stack
Stampin' Up! card stock - Daffodil Delight, Basic Black, Ballet Blue, Brocade Blue, Bashful Blue

Wednesday, October 19, 2011

Halloween Decor


This shadow box is one of my favorite Halloween Decorations.  I made it a few years ago but wanted to share it today.  I really do not like spiders at all and it is so out of my comfort zone to use one in a decoration but this one from Doodlecharms just was so perfect for this frame, I couldn't resist it.  I think the "Have a Spooktacular Halloween" is from a retired Stampin' Up! set.

Parts and Pieces:
Shadow box from Michaels - Unfinished
Black acrylic paint
Doodlecharms Cricut Cartridge
Creative Memories card stock


Tuesday, October 18, 2011

Moving again


These pages are not among my favorites but they do show a great event:  Leaving Fayetteville!!  I know a lot of people like it there but I am definitely not among them.  I did not really enjoy our time there and would be happy if we didn't go back.  To me Fayettville is the place of 15-month deployments and fire ants and frogs.  Ok, the frogs were kind of cool but the rest of it not so great.  I think every military wife has at least one duty station they would never want to go back to.  Fayetteville is one of mine.


Parts and Pieces:
Reminisce Simple Travel paper pack
Stamping Station Stickers
Stickopotamus stickers

Monday, October 17, 2011

July 4th Fun


I have to say the fireworks display at West Point was, by far, the best we have ever seen.  It was so incredible to sit at Trophy Point, overlooking the Hudson River, seeing the New Cadets march in and listening to the Army Band.  It really was an amazing experience.  And when the fireworks started - *sigh* - incredible! 
It is hard to see in these pics but I cut the words "fourth of" out of glitter card stock and used dimensionals to pop up "July".

Parts and Pieces:
Graphically Speaking Cricut Cartridge
Paper Studio All Seasons stack
Stampin' Up! Card stock - Brilliant Blue
DCWV Glitter stack
Stars from Oriental Trading

Saturday, October 15, 2011

We've been "Booed"!


Normally being "Booed" is a bad thing but not at Halloween!  One of our neighbors left us a special Halloween treat with instructions to "Boo" someone else.  While trying to decide what to do I saw Robyn's challenge at My Pink Stamper.  The challenge was to make a 3-D object for a holiday.  Well, that was perfect inspiration to make a fun bag for our "Boo" gift.

Parts and Pieces:
Kraft gift bag from Target
Mini Monsters Cricut cartridge
Happy Hauntings Cricut Cartridge
Stampin' Up! Card stock - Whisper White, So Saffron, Wild Wasabi, Tangerine Tango
Paper Studio All Seasons stack

Happy Scrapping!
Diane

The Great Outdoors


When we lived in North Carolina my middle daughter was very involved with a Girl Scout troop so fantastic we are not likely to see its equal again.  I have never seen two leaders inspire girls as much as these two wonderful ladies did.  My middle daughter learned so much from them and experienced so many cool things she probably wouldn't have otherwise.  I am grateful everyday for these great leaders!

Parts and Pieces:
DCWV Cotton Bloom stack
Stampin' Up! Basic Black and Yo-Yo Yellow Card stock
Cricut Expression
Graphically Speaking Cricut Cartridge
Prima Flowers
EK Success Brads

Friday, October 14, 2011

Braces Be Gone!


Oh Happy Day!!  The day my oldest daughter got her braces off was a day to rejoice for sure.  She was so happy and could not wait to be able to eat all the sticky stuff she couldn't eat before.
The letters for the title were left over from the pack I received with my kit from www.littleredscrapbook.com.

Parts and Pieces:
My Minds Eye Totally Girl paper pack
American Crafts Thickers chipboard alphabet

Thursday, October 13, 2011

Easter Fun


All materials on the pages pictured came from a monthly kit I received from www.littleredscrapbook.com.  I thought I would give it a try and really liked the variety of  materials I got with each pack.  I will definitely subscribe again once I get through my rather large stash of paper and embellishments I have stored in my scrap drawers.

Parts and Pieces:
Prima
Bo Bunny
American Crafts Thickers Chipboard letters

Wednesday, October 12, 2011

So many pictures!! So many projects!!

I cannot believe how many pictures I have to scrap!!  Thanks to the deals on Snapfish, I got 800 prints just in the past month.  I really need to get busy.
I have to admit I am feeling pretty overwhelmed right now.  I have many projects I want to work on but when I sit at my scrap table, I don't know where to start.  I don't know why I can't focus on just one thing and just work on it.  What is the best way to overcome this? 

Do I make a priority list?
Do I just start on whatever and see what happens?
Do I eliminate some projects so I feel less overwhelmed?

See how this can make a person completely crazy?

*sigh*  I guess I will just put on my comfortable sweats and get to work and try to not worry about the next thing I need to do.

Happy Scrapping!
Diane

Borders with the Imagine!


Yet another reason to love my Cricut Imagine - Borders!  This one from Imagine More was so easy and the colors were so fun to match up. 

Parts and Pieces:
DCWV Autumn Splendor Stack
Stampin' Up! Tempting Turquiose Cardstock 8 1/2 x 11
Cricut Imagine
Imagine More Cricut Cartridge

Tuesday, October 11, 2011

Snow in NC

A rare thing to see...Snow in Fayetteville, NC


We were so amazed in January 2009 when it snowed in North Carolina.  The entire town shut down for two days for just a dusting.  The kids had fun running around and sledding down the small hill in our neighbors yard. 
I used some metallic paper I had picked up at Walmart for the title.  I love the chunkiness (is that a word?) of Mickey Font.  It was so perfect for the shiny metallic paper.  The border and snowflake accents are from a Creative Memories pack I had in my stash. 

Parts and Pieces:
Cricut Expression
Mickey Font Cricut Cartridge
Creative Memories - snow accents and border.
DCWV Textured Card stock
Best Occasions Metallic Paper pack from Walmart

Thursday, October 6, 2011

A Beary Best Friend Card

This fun card is one of my favorites because it combines a few of my favorite things: Bears and my Create A Critter Cricut Cartridge.  The sentiment is from My Pink Stamper.  The background and the cutie bear's dress are embossed with the Cuttlebug. 
I can't wait to send this to one of my beary best friends. 

Parts and Pieces:
Cricut Expression
Create A Critter Cricut Cartridge
My Pink Stamper stamp set
Cuttlebug
Roses Cuttlebug embossing folder
Swiss Dots Cuttlebug embossing folder

Monday, October 3, 2011

Cricut Imagine in the House!!

My new "baby".

These were the four Cartridges that came with my Imagine.  So much fun!


The biggest change this year was the addition to a new "Droid" as my hubby likes to call my Cricuts.  I got a Cricut Imagine for Mother's Day.  I have to say this is the most amazing machine!  I love it.  I love that I can use my Imagine to create a scrapbook page in minutes and everything will coordinate and be so pretty and fun.  I have so many projects planned I don't know where to begin. 
With the craziness of the move (because all military moves are CRAZY!), I did not get to explore and play with my Imagine as much as I would have liked to.  I did a few very basic things, the first being the "Good Times" page element pictured above.  This is on the Imagine More cartridge.  Just a few minutes and I had it printed and cut out and ready to go.  I did make it just a little bit too big, but live and learn.  Now I know to check the size on the mat screen before I cut.
The layering was simple and I liked that I could choose between one solid element or layers so I could make changes if I wanted to, or I could make it like it is pictured in the book. 
I look forward to exploring the other Cricut Imagine cartridges available as well as using my existing Cricut cartridges in my Imagine.  The possibilities are endless!

Happy Scrapping!
Diane